


White balance ensures white objects come out white. Take controls in your own hand and learn how to set DSLR White Balance correctly.
White balance ensures that white objects appear white in your photographs. The principle is simple: if the white is accurate, all other colors in the scene will also be correctly rendered.
All light sources – be it sunlight, shadows, tungsten, fluorescent, etc. – have a color temperature. This refers to the warmth or coolness of the light.
Our eyes, in tandem with our brains, excel at determining what is white under various lighting conditions. They automatically compensate for any color cast the light may introduce.
However, DSLRs are not as adept and often need assistance.
Your DSLR offers a range of white balance settings, all designed to help you achieve the most accurate whites.
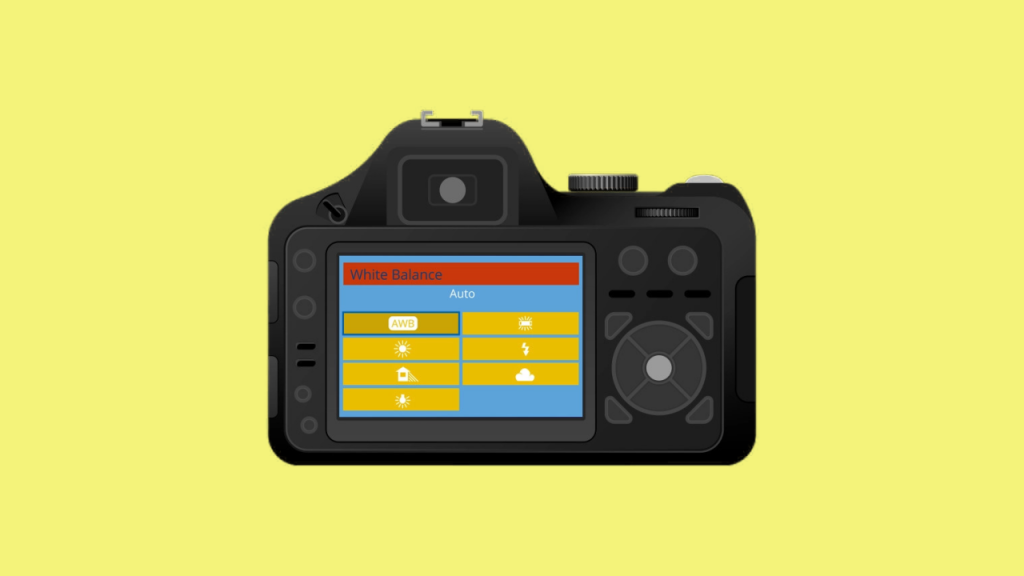

Many photographers keep their white balance set to Auto, which usually works well. In this mode, the camera evaluates the conditions and makes an educated guess about the correct white balance setting.
However, there are moments when the Auto mode may not achieve the desired white balance for the specific conditions.
If you wish to have more control, turn to your DSLR’s preset options. Browse through them to find the one that matches your current lighting conditions most closely.
Adjusting the white balance to match the ambient light is straightforward. If your camera has a WB button, simply press it. If it doesn’t, the setting is likely tucked away in a sub-menu.


For instance, if you’re shooting indoors with traditional household bulbs, opt for the tungsten preset. On the other hand, if you’re photographing outdoors on a cloudy day, select the cloudy preset.
Always remember to revert to Auto (or another relevant preset) as soon as the lighting conditions shift.
Take Full Control With Custom White Balance
Sometimes you’ll find yourself faced with a subject illuminated by two or more light sources, each with its own color temperature. You could opt for the Auto white balance and trust your camera to make the right decision.
Alternatively, you could establish a custom white balance setting using an A4 sheet of white paper. While DSLRs have varied methods for setting custom white balance, the general idea is to position the sheet of paper under the lighting you wish to calibrate for.
Take a photograph of the paper, ensuring it fills the frame, then adjust the settings on the camera until the paper appears white.


This configuration can then be stored as the camera’s custom white balance, suitable for all subsequent photos taken under those lighting conditions. Should the lighting change, you’ll need to photograph the paper once more and recalibrate.
If carrying around sheets of paper doesn’t sound practical, consider another solution:
Shoot in the RAW file format. Once you’ve transferred the images to your computer, you can access the same white balance controls as those on your camera, allowing you to select the one that best complements your photo.

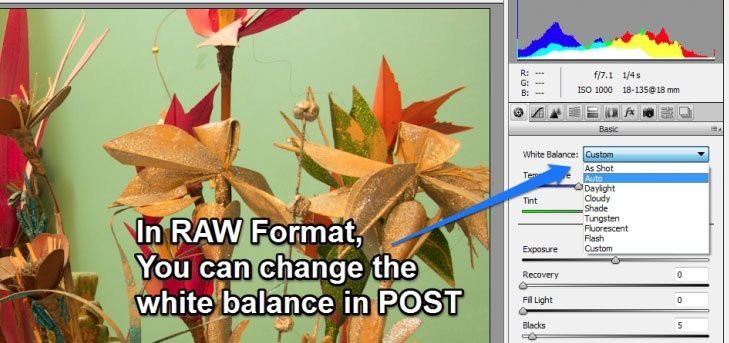
Programs like Photoshop can be used to open RAW images on your computer, enabling post-production adjustment of white balance.
Remember that white balance isn’t just a tool for correction – it’s also an artistic lever.
Experiment by capturing the same scene using all your camera’s white balance presets and evaluate the outcomes. Not every result will be perfect, but some might offer a unique touch to your photos.

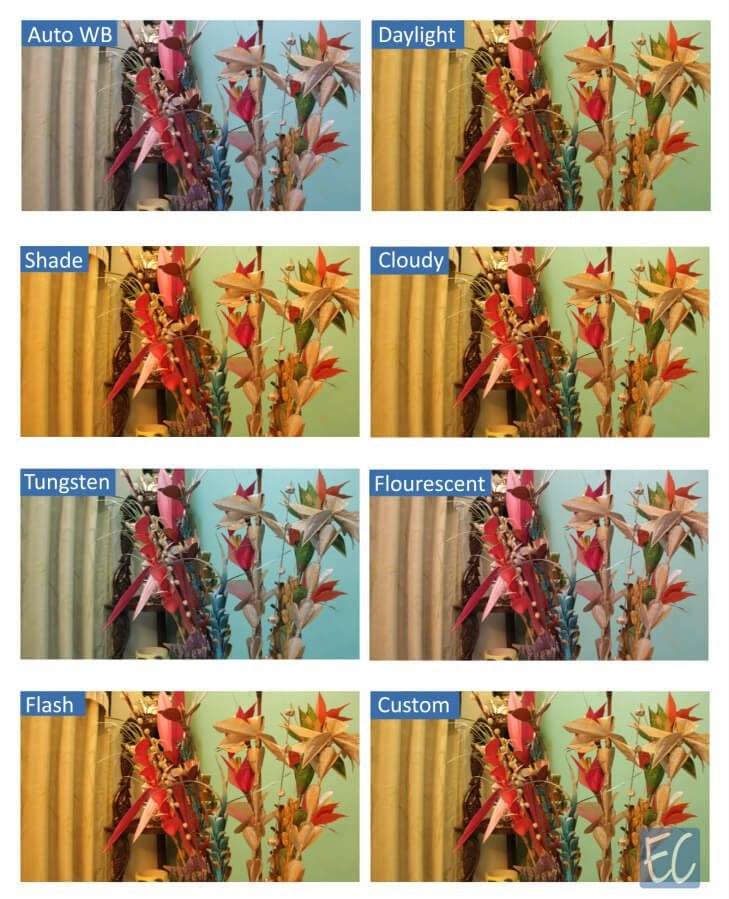
When you explore the various white balance presets on your DSLR, you’ll notice how the camera compensates for the orange hue from household bulbs (fluorescent and tungsten) by introducing blue. This adjustment can even be leveraged outdoors to achieve a chilly blue effect.