In this blog post, I’ll explain LUTs in the simplest way possible – what they are, how they function, and how you can use them effectively.
When I first started using LUTs (Look Up Tables), I thought they were just filters or presets that could instantly transform my videos into cinematic masterpieces. However, as I delved deeper, I realized I was using them completely wrong.
Even today, when I observe some video editors, I see that while everyone is applying LUTs, very few understand how they actually work. For many, LUTs are nothing more than Instagram filters slapped onto their footage. But the truth is far more nuanced, and understanding it can drastically improve your editing workflow.
In this blog, I’ll break down what LUTs are, how they work, and how to use them effectively in a way that’s simple to understand.
What Are LUTs?
The term LUT stands for Look Up Table. At its core, a LUT is a table that stores color values, allowing editing software like Adobe Premiere Pro to “look up” those values and apply them to your footage.
If you open a LUT file in a text editor, you’ll see a table with three columns of numerical values. These columns represent three dimensions of color: Red, Green, and Blue (RGB).
This is why LUTs are often referred to as 3D LUTs – they have three dimensions, one for each primary color.
The 3D Structure of LUTs
To better understand LUTs, let’s visualize them in a 3D space. Imagine a cube where:
- One axis represents Red
- Another represents Green
- The third represents Blue
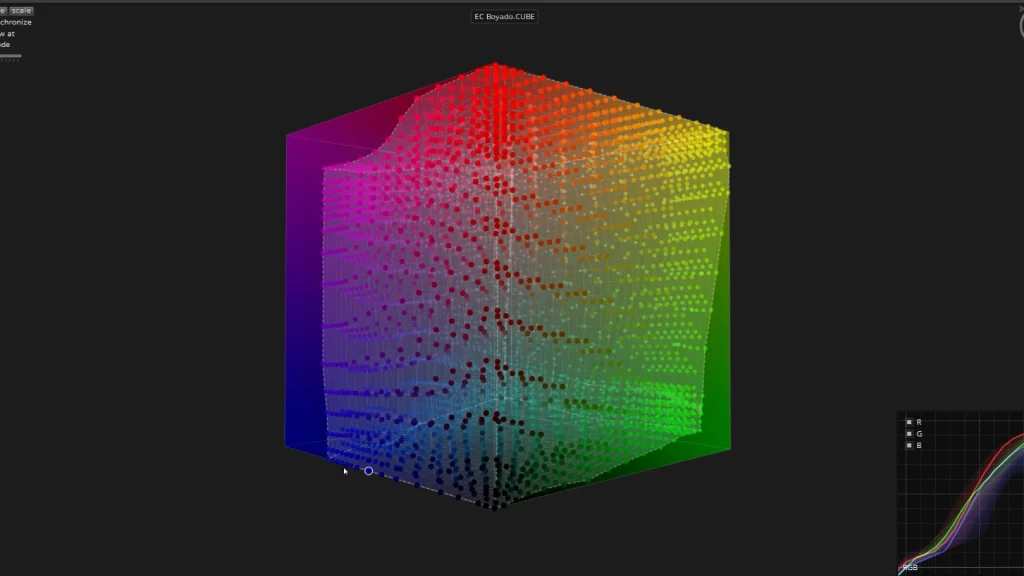
Each axis starts from black (no color) and transitions to full saturation. Any point within this cube is a unique combination of red, green, and blue values, defining a specific color.
When you apply a LUT to your footage, your editing software maps the original color values (input) of your video to new color values (output) based on the LUT’s coordinates.
For example:
- Input value: (0.14, 0.59, 0.75)
- LUT Output: (0.5, 0.8, 0.9)
This process essentially remaps the input colors of your footage to create the desired look.
Why Understanding LUTs Matters
Understanding how LUTs work can clarify why they sometimes deliver stunning results and other times fail to meet expectations. It all comes down to providing the correct input for the LUT to function effectively.
If the input isn’t right, the output will also be off.
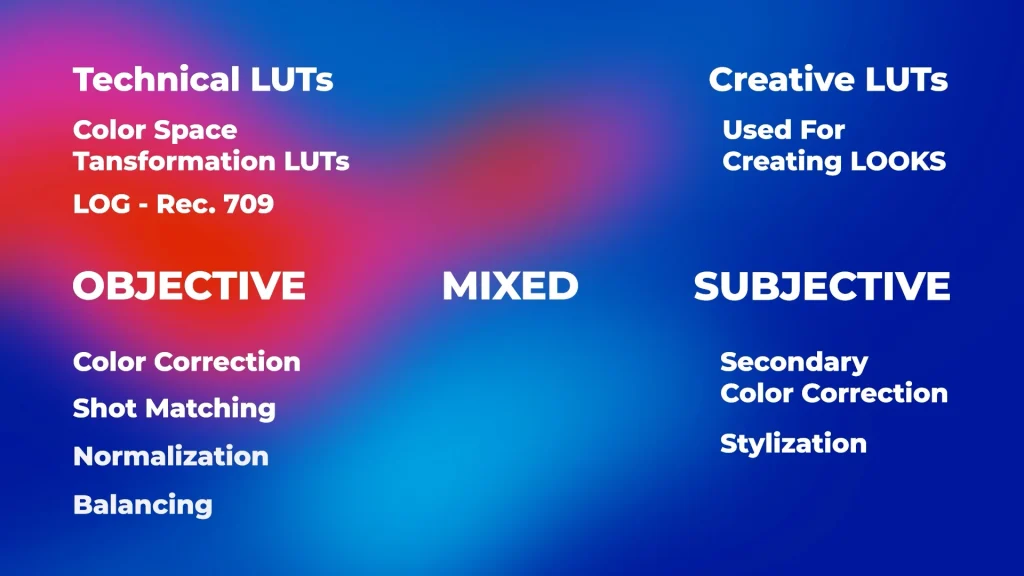
Types of LUTs
There are three main types of LUTs, each with a distinct purpose:
1. Objective LUTs
These are technical LUTs used for tasks like color space transformation, converting footage from one color space to another (e.g., LOG to Rec. 709). Their primary role is accuracy and consistency.
2. Subjective LUTs
These are creative LUTs used to achieve a specific aesthetic or “look.” They add a stylized feel to your footage but can create problems if applied incorrectly, especially if the input footage isn’t prepped for them.
3. Mixed LUTs
These LUTs combine elements of both objective and subjective LUTs. For example, they might handle color space conversion while also adding a slight creative touch.
Phantom LUTs are a good example of Mixed LUTs.
Integrating LUTs into Your Workflow
To get the best results from LUTs, integrate them thoughtfully into your workflow. Divide your editing process into two stages:
1. Objective Stage
This is where you perform color correction, shot matching, and normalization. Tasks like balancing colors and transforming color spaces happen here. Use Objective LUTs or Mixed LUTs during this phase.
2. Subjective Stage
This is where creative grading comes in. Use Creative LUTs to stylize your footage after you’ve balanced the colors.
The Secret To Successful LUT Application
The key to using LUTs effectively lies in creating the correct input for them. For example:
- If your footage is shot in a LOG profile, use a color space transformation LUT to convert it to Rec. 709 first.
- Once your footage is properly balanced, apply a creative LUT to achieve your desired aesthetic.
By following a proper workflow, you’ll ensure that LUTs receive the input they need to produce stunning results.
Final Thoughts
LUTs are a powerful tool in video editing, but only if you understand how they work and use them correctly. By mastering their application, you can unlock their full potential and create videos with a truly cinematic look and feel.
If you’re looking for high-quality LUTs, check out our LUTs pack featuring 50 cinematic LUTs for just $2. These LUTs work with any non-linear editing software and are perfect for taking your projects to the next level.